August 9, 2013

You Never Know What You Will Find

We have found that this phrase is one often shared among owners of old homes, and our home has proven to be no exception.  From pipes that go nowhere, to walls inside other walls, and an exterior door that doesn't lead in, our house has given us all kind of head-scratchers.

One recent oddity was discovered while fixing up the room that will become our children's playroom.  Since many of the old electrical receptacles have layers of paint on them, I like to replace them as we work from room to room.  This particular room had a receptacle that was actually right in the base trim!  While this is the only outlet like this in our house, I have seen this in other homes in our neighborhood and it is fairly common.  Regardless, I fully intended on moving the outlet up into the wall and patching the painted trim.

This is not exactly up to code.
What I wasn't expecting was to find that there was no outlet box.  This particular outlet was just hanging out without anything between the wires and the wooden trim and lathe.  Further exploration yielded the light switch was the same.  Wow, that is dangerous!

New home and old home of the outlet(s).
 So I added a box further up the wall where there are now two, much safer, outlets.  The light switch also has its own plastic box as well as a Dr. Seuss's One Fish, Two Fish, Red Fish, Blue Fish switch plate to go with the playroom theme.

To Here or To There?
You just never know what you will find!

August 3, 2013

Dining Room - Windows

The dining room windows are finally done! We had the windows replaced last October, and I just finished the curtains last week.

Here is what the old windows used to look like:

A cracked pane in one of the old dining room windows.

The old dining room windows on the front side of the house. The lower window on the left has no glass in it at all!


The view from outside. 


This is what they look like today:

The new windows!


The view from outside.

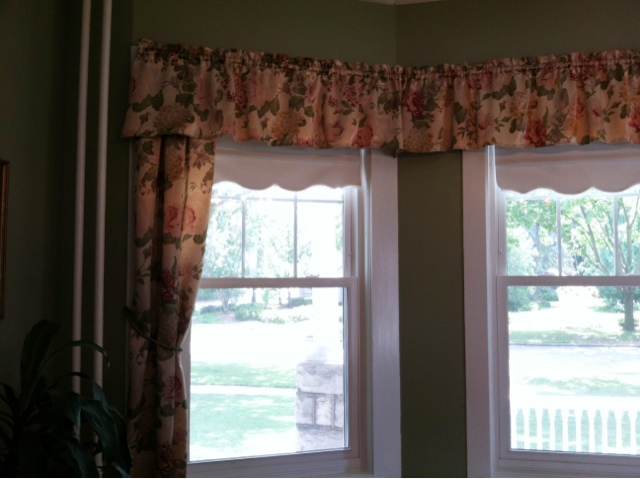
Here are the curtains! The green in the fabric matches the wall color, and the dark magenta peony flowers match our chandelier. I got the new roller shades for my birthday. It's funny how your birthday presents change into more practical things as you get older!


The side window. There is no longer a big crack in the bottom pane!

July 29, 2013

The Beginning of Porch Repair

The uniqueness of our front porch is one of the features that attracted us most to our home.  This porch spans the entire width of our house and circles around the turret to create a nice living space we hope to enjoy for much of the year.  Sadly this was one area of the house that was neglected over the years before we purchased this house.  But with the help of Pat Drury and his team from Drury Designs, today marks the beginning of the repair work to our porch.

The first day of porch repair
We have been very impressed with Pat's previous work including a few historic homes in De Pere, as well as the creativity and spark he brought to the work at the restaurant S.A.L.T.  It has been great to work with someone with as much enthusiasm for preserving the historic features of our house and using as much original or reclaimed materials as possible.

The Drury team begins work on the porch.
For our porch there are a couple areas of concern that Pat and his team will be starting with.  First, we have a few stone columns with wooden pillars that years of water damage have taken its toll on.  In the photo below, you can see the the worst section of the needed repairs -- a leaning stone column.

This would only be acceptable in Pisa.
Another area that will be repaired is our front step.  It is old, cracked, and actually crumbles apart when it is used.   I am sure it has been an eyesore in this neighborhood for years, and we won't be the only ones glad to see it replaced. 

The crumbling steps
While this is just the start of this project, we are very excited already.  We will be reporting more on the progress as the porch project continues!

May 20, 2013

The Study Bathroom - Windows

New windows can really make a difference in a room's appearance... especially if the room is rather small and dark. The bathroom off of our study is a perfect example.

Before, the windows didn't open, and they looked like this:


The view from outside.

Not being able to open the windows would have been really hard. Even if we don't open them all that often, it's still nice to know that we have the option. 

Now, the windows look like this! These are triple-pane, awning-style windows.


This bathroom has a lighthouse/nautical theme. 

The bathroom feels so much brighter now.  Thanks, Window World for your excellent service and product!


March 31, 2013

Adding a Pantry

Even though our house was originally built for a family of eight, the size of the kitchen is much smaller than most would expect.  While it was similarly sized to our previous house and we felt right at home with its cozy size, it was missing one thing we liked at our other house -- a pantry.

The fridge in its new home.
Pantry installed with no doors yet.
We decided to make better use of the space that was once a breakfast nook.  We had Randy Buell of R&J Custom Furniture, Cabinets, and Trim make us some new cabinets that would become our new pantry.  He also added a nice wine rack in the space above the refrigerator to close the space in. 

Our new pantry and wine rack.
In the space where the refrigerator originally stood, Randy made us some new base cabinets, a butcher block counter top, and fit in an extension to hanging cabinets that blended in well.  


The new counter top and cupboards being installed.
The new cabinets and butcher block where the refrigerator once stood.
Naturally, a project in an old home is not without its challenges.  It turned out that the walls where the wine rack was to fit were not exactly square and it was a bit too snug.  Luckily, Randy has his belt sander with him and a rubber mallet.  A few runs with the sander and then a series of whacks with the mallet and the wine rack was in place.  

Randy Buell getting the wine rack in place.

March 20, 2013

A World of Difference: Windows

It can be difficult to preserve the original look and feel of a historic home. Though we want to do as many things as we can to keep our 1902 Victorian looking as historically accurate as we can, we knew that keeping the original windows wasn't going to work out for us. There were so many windows that had broken or missing panes, we didn't see it as an option to keep the original windows. Not to mention that the Wisconsin winter was fast approaching, and we wanted to have as much insulation between the inside and the outside of our house as we could get.


A missing corner piece of one of the old windows.
A crack in one of the old windows.


We gave Window World a call, and Art Lane came over to look at our project. I did a walk-through with him, and we came up with 26 windows that we wanted to have replaced.

Levi and Eric from Window World came to our house over a period of three days to install our new windows.  They removed the old windows, insulated the weight pockets with spray foam, and installed the new windows. They did an amazing job, and we would highly recommend them to anyone who is considering having any windows replaced.


Before: the north side
After: the north side


Most of the windows are white vinyl, but some have an oak finish on the inside to match the surrounding stops and trim. They had many options for us to choose from. We went with the colonial-style grill pattern in the top half of each of the triple-pane, double-hung windows.
Not only does our house look so different now that we don't have any broken windows, we also have the peace of mind knowing that we have a lifetime warranty in case one of the new windows gets broken.

Future blog posts about the windows will bring you on a room-by-room journey with before and after pictures of what the room looked like with the old windows, what it looked like with the new windows, and (hopefully!) what the windows look like now. I'm making all of our curtains with my new sewing machine, and as I get finished, I will post a picture of what the finished product looks like.

Keep checking back to see our progress! 

January 15, 2013

Trimming up the Trim

Of all the rooms in our house, we liked the original color of the walls in the dining room the best.  A nice robust green color, it reminded us of the color in our dining room we had at our previous house.  While we've had a number of rooms already painted (kitchen, bathroom, sewing room), we felt that the green in the dining room was nice enough to keep as is.  Even with the nicely painted walls, this room still needed some attention -- the base trim.

The trim as it was when we moved in.
Although I am generally not a fan of painted trim, the white color does go well with the green walls.  The problem was that the paint had flaked off and was showing many signs of age.  All it took was a fresh coat of paint and our dining room trim was looking like a nice clean inviting space again.  

A fresh coat of paint makes all the difference.